


You picture soaring beams and the fresh scent of milled timber as your dream home rises. Yet one question nags at night: what will it cost?
Across Canada, custom timber-frame homes now finish at roughly $400–$700 per square foot turnkey, with luxury builds climbing higher. That’s a major outlay, and shifting lumber prices, labour rates, and mortgage costs create new wrinkles each season.
ADVERTISEMENT
ADVERTISEMENT
Our goal is simple: replace guesswork with a step-by-step roadmap. We’ll break the budget into core pieces, compare regional price bands, and show you how to build an estimate that includes a contingency for surprises.
Ready? Let’s turn big-picture dreams into firm, confident numbers.
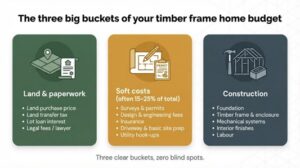
Breaking down the total cost – the three big buckets
Every sound estimate starts with one fact: your final price covers more than the house itself. According to the Normerica builders cost breakdown, each dollar falls into three buckets, and we’ll use the same framework because it keeps budgets transparent.
First comes the land and its paperwork. Think purchase price, land-transfer tax, interest on a lot loan, and the lawyer who records the deed. If you already own the property, great; you’ve reduced Bucket One. If not, note the cost now so it never sneaks up later.
Bucket Two covers soft costs. Surveys, permits, design fees, insurance, hook-ups, a gravel driveway, maybe a bit of blasting to level a knoll—all the prep that makes a raw site build-ready. These items rarely appear in glossy brochures, yet they can swallow 15–25 percent of your overall spend.
Finally, Bucket Three is the construction itself. From the foundation pour to the final coat of stain on your rafters, this is the visible, tactile part of the dream. Normerica’s data shows the timber-frame shell often lands around one-quarter of this bucket, while the remaining three-quarters pay for enclosure, mechanicals, finishes, and labour.
Break your budget this way and you’ll spot gaps before they turn into overruns. Three clear buckets, zero blind spots.
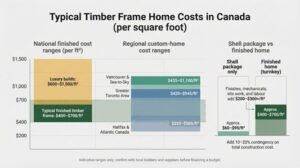
What’s the price tag? – typical timber-frame costs in Canada
Let’s talk hard numbers. Across most of the country, a fully finished custom timber-frame home lands between $400 and $700 per square foot. Normerica’s 2025 cost guide confirms that mid-range, showing how finish level and mechanical complexity move you up or down the scale.
Luxury designs climb higher. Canadian Timberframes lists high-spec mountain or lakefront builds at $600 to $1 500 per square foot, evidence that intricate joinery, premium species, and resort-area labour rates can double or even triple the baseline. The same source also suggests a 10–20 percent contingency to buffer surprises.
Regional labour markets matter too. Altus Group’s construction index puts custom single-family costs in these bands:
- Vancouver & Sea-to-Sky: $435 – $1 100/ft²
- Greater Toronto Area: $420 – $945/ft²
- Halifax & Atlantic Canada: $255 – $505/ft²
Those spreads align with builder quotes in the field; big-city wages and stricter energy codes inflate budgets, while smaller markets remain gentler on the wallet.
Many ads promote only the “shell package.” A Douglas-fir frame and SIP enclosure might cost $70–$95 per square foot of house area, yet finishing that shell—windows, drywall, cabinets, flooring, and plumbing—adds another two or three hundred dollars. Hamill Creek Timber Homes publishes a transparent kit cost breakdown; its complete packages, often shipped for timber frame homes Pennsylvania and other U.S. builds, run about $60–$90 per square foot and list every included beam, engineered drawing, and on-site raising service.
Use that level of detail as your benchmark and confirm whether a quote is shell only or turnkey before you enter it in your spreadsheet. Confirm whether a price is shell-only or turnkey before adding it to your spreadsheet.
The guide also spells out what the kit price covers—engineered drawings, numbered mortise-and-tenon timbers, oak pegs, hardware, and on-site raising—so you can compare shell quotes on a true like-for-like basis.
With this national snapshot you now have a realistic spectrum. Next, we’ll see why costs climb or drop so you can guide your own build into the ideal zone.
Factors that influence your timber-frame budget
Costs never climb at random. They hinge on a handful of levers that you control more than you might think. We’ll look at each lever so you can raise or trim spending with intention, not guesswork.
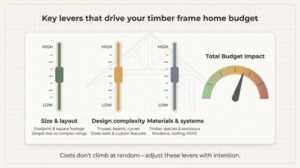
Size and layout – square footage vs. budget
Bigger seems obvious, but the size-to-cost link is subtler than “more square feet equals more dollars.”
A simple rectangle gains efficiency as it grows. Foundations, roofs, and mechanical cores scale gently, so the cost per square foot often dips on a larger, boxier plan. The carpenter who sets a crane or mill jig does it once, whether your footprint is 1 800 or 2 400 square feet.
Add bump-outs, multiple wings, or a soaring great room and the math flips. Extra corners add labour hours. Cathedral ceilings leave fewer usable feet while requiring the same timber volume and sometimes heavier beams.
Normerica’s case studies show that every additional 100 square feet finished to a mid-range spec at about $500 per foot adds $50 000 to the bottom line.
Before you sketch that hobby room or second mud entry, ask whether you will use the space every day. Streamlined footprints guard budgets without sacrificing the drama timber framing already provides.
Design complexity and custom features
Timber framing is both structure and artistry. The moment you add curves, hammer-beam trusses, or elaborate king-post assemblies, artisans slow down, chisels come out, and labour hours climb.
Picture two great rooms of equal size. One uses straight posts and common rafters. The other features arched tie beams, steel tension rods, and carved corbels. Material cost rises a little, but labour cost jumps because each unique joint needs shop drawings, custom CNC files, and extra fitting time on site.
Finishes follow the same rule. A simple stained-pine ceiling installs quickly. Swap in reclaimed barn boards or intricate tongue-and-groove patterns and you add days of work plus premium material pricing. Custom iron brackets, a stone fireplace that reaches the ridge, or a wall of glass trigger similar increases.
Normerica’s mid-range projects show about 25 percent of construction dollars flowing into the timber shell and joinery. Increase complexity and that share can push past 30 percent, shrinking the funds left for everything else.
When an architect suggests a sweeping glulam stair or exposed curved collar ties, pause. Ask whether the flourish delights you enough to justify the added craftsmanship. If yes, budget for it early and trim elsewhere. If not, let clean lines and honest joinery shine; simplicity keeps costs in check and timeless appeal intact.
Material choices – timber, enclosure, and systems
Timber species set both the mood and the bill. Douglas fir and eastern white pine lead Canadian frames because they balance strength, span, and price. Opt for reclaimed barn timber or imported oak and you can add 5–10 percent to the shell cost with one decision.
The way you close the structure matters just as much. Structural insulated panels (SIPs) install quickly and boost performance, yet their sticker price exceeds that of stud walls. Builders who switch to panels often break even because labour hours drop, provided the crew knows the system.
Windows, roofing, and mechanicals finish your material stack. Triple-pane glazing or a standing-seam metal roof may look costly until you factor future energy savings and low-maintenance life. Normerica’s project logs show the timber package averages 25 percent of build cost, leaving 75 percent for these “invisible” choices that quietly drive comfort and operating costs.
Treat materials like a mixing board. Boost sustainability or curb appeal where it counts—such as exposed great-room timbers or front-elevation windows—and scale back in utility spaces. Smart swaps here can save tens of thousands without diluting the character that drew you to timber framing.
Location, site, and region – where you build matters
Canada is vast, and building costs shift with geography. A carpenter in Vancouver’s Lower Mainland charges a different hourly rate than one in rural Nova Scotia, and that delta flows through every trade on your project.
Altus Group’s cost index shows the spread. Custom-home construction in Vancouver often sits between $435 and $1 100 per square foot, while similar work in Halifax ranges from $255 to $505. The gap reflects wages, stricter seismic framing in the West, and higher municipal fees in large urban centres.

Your lot adds more nuance. A rocky Muskoka peninsula might need blasting and barge delivery, adding five figures before the first form board. Prairie clay calls for deeper footings, while coastal sites require hurricane ties and stainless hardware. Even snow load matters: build at elevation in the Rockies, and your rafters must beef up to carry winter’s weight.
Permits are another variable. Some Ontario townships bundle sewer, parkland, and development levies that exceed $25 000 on day one. Rural builds skip those fees but swap them for a well and septic system that can cost just as much.
The takeaway: pin your estimate to your exact postal code, not a national average. Secure quotes from local trades, review zoning checklists, and budget extra for any logistical gymnastics your dream location demands.
Builder selection and build approach – DIY, GC, or turnkey
Who steers the build affects every dollar and every deadline.
A full-service timber-frame builder delivers a turnkey package. The firm manages trades, schedules inspections, and adds about 10–15 percent for overhead and profit. That margin buys accountability: you write one cheque and hold one party responsible if schedules slip.
Acting as your own general contractor removes that markup but moves the headaches to your calendar. You will chase quotes, coordinate deliveries, and solve on-site surprises at 7 am. If construction is not your day job, budget a healthy contingency. Canadian Timberframes advises 10–20 percent because owner-builder projects face more change orders and weather delays.
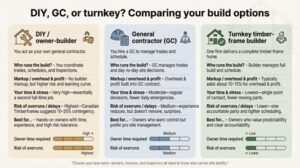
Hybrid routes split the difference. Many companies erect the frame and close in the shell, then hand you a weather-tight structure to finish at your pace. Financing often improves once the bank sees a closed-in house, and sweat equity on flooring, trim, or paint can cut tens of thousands without risking the core structure.
Whichever lane you choose, decide early. Lenders, insurers, and municipal inspectors all need to know who carries liability on site. Clear roles keep paperwork smooth and budgets steady.
Step-by-step guide – how to estimate your timber-frame budget
Big pictures inspire, but spreadsheets fund the dream. We will walk through seven simple moves that turn loose wishes into a dialed-in dollar figure you can share with architects, lenders, and your spouse. Master each step in order and your final number will feel less like a guess and more like a guarantee.
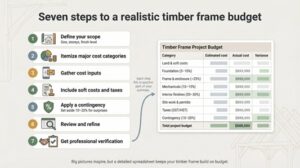
1. Define your scope
Start with the basics: square footage, storeys, and finish level. Grab a notepad and describe the home you intend to live in, not the castle Instagram floated last night.
Anchor your math with the national range we covered earlier. A 2 500 square-foot home finished to a mid-range spec at about $500 per square foot totals roughly $1 250 000 in hard construction cost.
Write that baseline down. It is only a starting point, but it sets guardrails before you sift through cabinet catalogues or window showrooms. If the total already feels tight, trim size or adjust finish expectations now. Making the change later costs more.
2. Itemize major cost categories
With your baseline set, break the lump sum into bite-size pieces. Picture a grocery receipt: you want to know what each ingredient costs before you reach the checkout.
Start with the foundation, often 5–10 percent of total construction. Next comes the timber frame and enclosure. Normerica’s projects show the shell taking roughly 25 percent of the build, a helpful yardstick if you lack quotes. Plumbing, electrical, and HVAC together claim another 10–15 percent. Interior finishes such as floors, cabinets, and tile soak up 20–30 percent, depending on taste. Finally, plug in site work, permits, and insurance.
List these categories down the left side of a spreadsheet and spread your baseline across them using the percentages above. Instantly, you will see which slices hog the pie and where trimming a few points frees serious cash.
3. Gather cost inputs
Replace ballpark percentages with real numbers. Call at least two timber-frame companies for a shell quote, then email three local subcontractors for foundation, mechanical, and finish allowances. Comparing bids side by side exposes outliers fast.
No contacts yet? Start with builders cited earlier. Normerica, for example, can provide a quick frame-and-SIP figure once you share basic square footage and a sketch. Use that number as an anchor, then add data from suppliers or cost databases such as Altus or RSMeans. Their tables list average concrete, plumbing, and electrical rates for each Canadian province, so you avoid blind guessing.
If bids vary, average the mid-range numbers. Resist choosing the lowest; in construction, cheap often means change orders later. Add freight if your site is remote, and remember exchange rates if specialty hardware crosses the border.
By the end of this step, every row on your spreadsheet shows a dollar figure grounded in today’s market, not yesterday’s blog post or tomorrow’s hope.
4. Include soft costs and taxes
Hard numbers mean little if you ignore the paperwork that makes a build legal. Soft costs—design fees, surveys, permits, development charges, and construction insurance—add up fast. In many provinces they reach 15–25 percent of the construction total.
Next comes tax. New homes in Canada trigger GST or HST on most labour and material invoices. A five-percent GST bite on a one-million-dollar build is fifty thousand dollars. Rebates exist, but they shrink as price rises, so confirm your eligibility well before the slab is poured.
Add utility hookups, temporary power, and job-site sanitation to this column. Each item looks small alone, yet together they can match your window package. Listing them now shields you from the most frustrating overrun, the one the government sends by mail.
5. Apply a contingency
Even the sharpest estimate cannot predict a spring flood, a lumber tariff, or a sudden desire for Italian tile. That is why we add a safety cushion.
Canadian Timberframes recommends reserving 10–20 percent of total construction cost as contingency. On a one-million-dollar build, that equals $100 000–$200 000 set aside, money you control rather than money you must spend.
Keep these funds in a separate account. Use them only for genuine surprises: a well that must drill deeper, a code change mid-permit, or materials that climb in price before delivery. If the contingency sits untouched at move-in, celebrate. You can pay down the mortgage or invest in landscaping, and you will never lose sleep over an overrun.
6. Review and refine
Sum every column, then look at the grand total with fresh eyes. Does the figure match your financing comfort zone? If it overshoots, adjust levers methodically rather than panicking.
Trim footage by five percent and watch multiple line items ease. Swap a premium metal roof for high-grade shingles and see thousands disappear without touching lifestyle. Re-run the math after each tweak so you always compare apples to apples.
Spreadsheet iterations may feel tedious, yet every minute spent here prevents costly change orders on site. Keep refining until the number, the design, and the bank pre-approval all align.
7. Get professional verification
Spreadsheets bring confidence, but professional eyes deliver certainty. Share your polished estimate with at least one seasoned timber-frame builder and, for larger projects, an independent cost consultant. Their red-pen notes often reveal missing line items such as winter heating for crews, crane overtime, or a last-minute energy-code inspection that owners overlook.
Conclusion
Treat this review as a final dress rehearsal before you request a construction loan or sign a fixed-price contract. When professionals confirm your math, lenders relax, schedules lock in, and the path from concept to cutting beams feels clear.
Related Reads


Latest Posts


ADVERTISEMENT